Right Knee Rehab & Strength Plan
12 weeks — Monday Aug 24 to Sunday Nov 15, 2026. Built from the physiotherapy instructions, the six exercise videos, and the reference images in this folder. Runs on top of the existing 3×/week gym program (Mon / Wed / Sat). Goal: fix the left–right imbalance, calm the right knee, restore left-ankle mobility, and build enough impact tolerance to start hop testing (≥90% leg symmetry) — without any new injuries.
The rules — read before every session
A high pain tolerance makes it easy to overdo things, so pain is rated on the 1–9 scale below — using the words, not gut feel — and the traffic light decides what happens next. This single habit is what makes "no additional injuries" realistic.
Pain during exercise
If pain hits 4–5, modify one of these variables
Range of motion · exercise choice · contraction type · body position · rest time · frequency · duration · weight/load · speed. Change one, retest, continue.
The two 24-hour checks (pain response after exercise)
- Pain must settle back to baseline (1–2) within 24 hours of a session.
- The next morning the knee must not feel stiffer than usual.
If either check fails, the previous day was too much — repeat it one level easier before progressing.
The 1–9 pain scale
Very mild, barely noticeable — mostly forgotten.
Aware of it only when paying attention.
Bothers me, but I can ignore it most of the time.
Constantly aware of it, but can continue most activities.
Think about it most of the time; some daily activities impossible.
Think about it all the time; give up many activities.
In pain all the time; it prevents most activities.
Hard to think of anything else; talking is difficult.
All I can think about; can barely talk or move.
Equipment
Everything in this plan uses the home kit below — the gym adds benches, pads/boxes, and machines.
| Equipment | Used for |
|---|---|
| Kettlebells — 2×8 kg · 12 kg · 16 kg · 2×20 kg | Counterbalance squats (8), goblet loading for split/Bulgarian squats (8→16), RDLs (16–20), single-leg RDLs (8–12). |
| Swiss ball | The full hamstring ladder (P1) at home: bridge holds → curls → single-leg. |
| Mini loop bands (light / medium / heavy) | The whole hip endurance circuit (H1–H5): banded squats, split-the-floor holds, single-leg reaches, monster steps, step-throughs. |
| Long resistance band | Toe yoga big-toe press (M1), single-leg RDL learning version (P3), hamstring stretch assistance. |
| Yoga blocks — cork & foam | Big-toe stretch on the cork block (M1); forefoot lift for a deeper ankle mobilization (M4); stack them as a depth target for home squats (S1). |
| Foam roller | The full lower-body release routine (F1–F6). |
| Massage ball | Foot arch, glute corners, calf spots the roller can't isolate. |
| Massage gun | Lazy-day substitute for rolling; quads and calves after training. |
| Towel | Slider for reverse/lateral lunges (A1, A2); rolled up for knee-extension mobilization (M2); toe scrunches (M1); backup hamstring-curl slider if the ball is in the way. |
Daily non-negotiables (M1–M4) — every day, all 12 weeks
Four items, ~20–25 minutes spread across the day, no equipment beyond a towel, band, and a wall. None should ever exceed pain 3. These work through daily frequency, not effort — this is where consistency beats intensity.
Toe yoga — foot & big-toe control
M1 · MANY TIMES A DAYWork through the sequence in order, standing or seated. Steps 1–5 are the core routine; the two extra steps target a stiff big-toe joint whenever there's a spare minute.
All-toe lifts — lift, splay, fan down
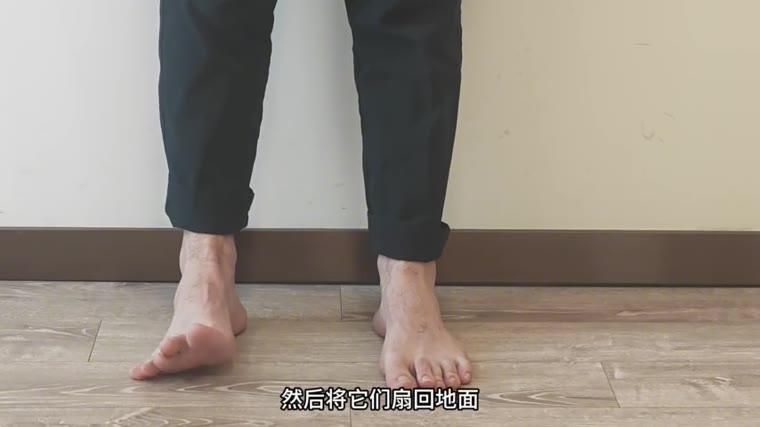
Lift all 10 toes off the floor, spread them as wide as they'll go, then lower them fanned out — placing them down one by one, pinky to big toe. 10 slow reps.
Big-toe dissociation
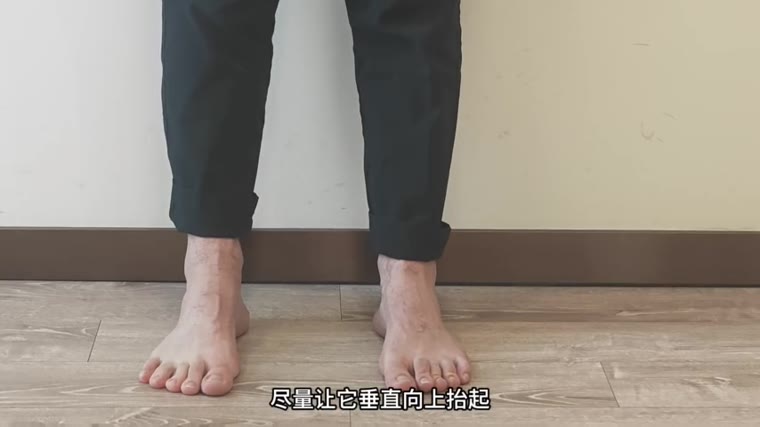
Lift only the big toe straight up while the other four stay pressed down — then reverse: four toes up, big toe pinned. 10 each way. Clumsiness is normal for weeks; that's the nervous system relearning the control.
Short foot — arch squeeze
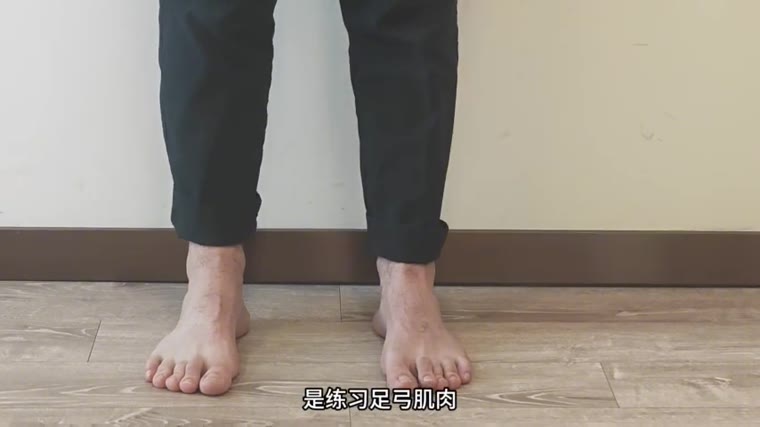
Imagine pulling the heel toward the ball of the foot so the arch lifts — without curling or gripping the toes. The foot gets visibly "shorter". 10 × 5 s holds.
Band press — resisted big toe
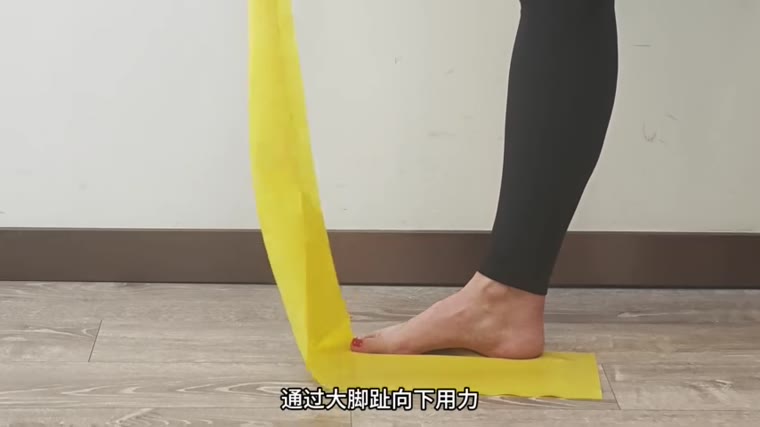
Long band under the big toe, pull it up to create tension, then drive the toe down into the floor against it. The arch muscles should fire — that's the point. 10 × 5 s presses.
Towel scrunches
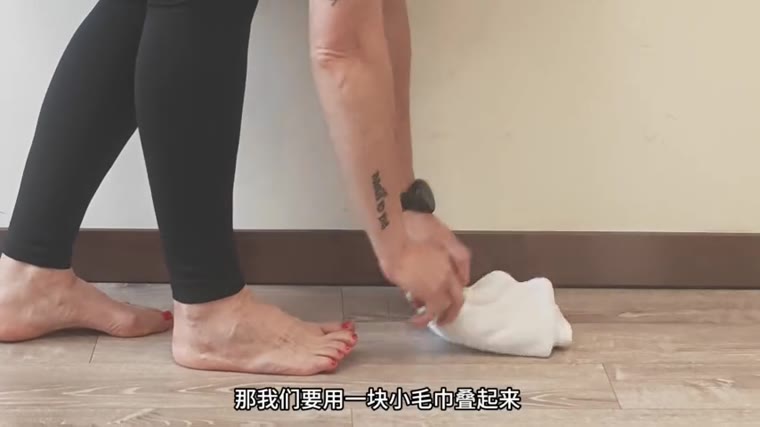
Scrunch a towel toward you with the toes, letting the knee travel forward as the pull gets bigger. Fingers may assist the first weeks. 2–3 passes.
Extra · Big-toe joint mobilization (for a stiff joint)
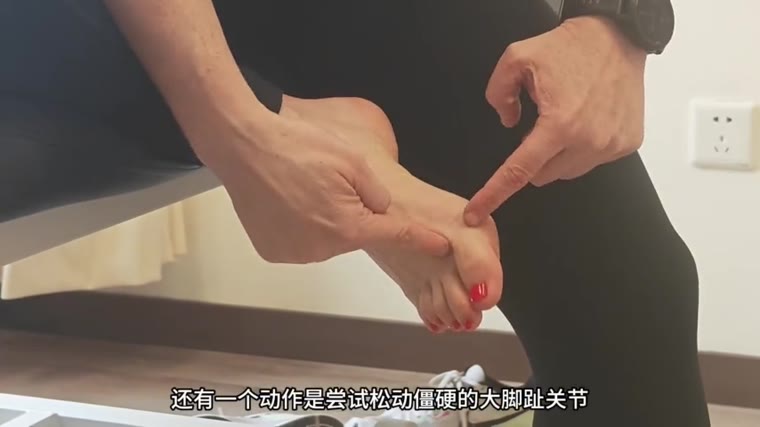
One hand stabilizes the forefoot, the other grips the big toe near the joint: gently pull to open the joint space, then bend it up and down. ~1 min per side.
Extra · Big-toe stretch on the cork block
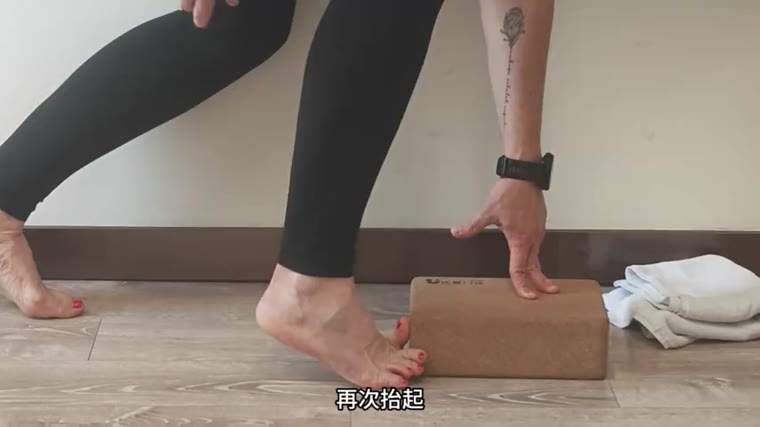
Big toe up on the cork yoga block, other toes on the floor; bend the knee forward and lean in to deepen. 30–60 s per side.
Avoid footwear that blocks toe movement — narrow, stiff toe boxes undo this work. Wide toe-box shoes or barefoot at home.
Knee flexibility mobilization (right knee)
M2 · 2–3×/DAY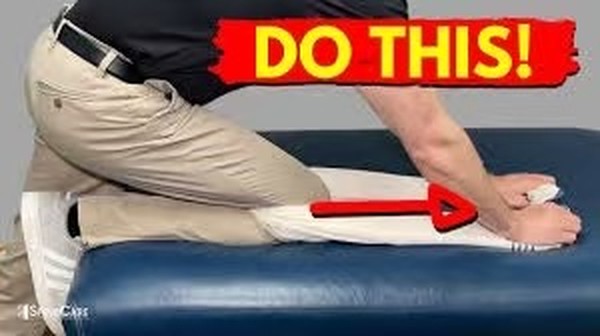
Leg straight on a bed or bench, rolled towel under the ankle so the knee hangs free, then let the knee settle toward full straightening. Add gentle hand pressure just above the kneecap, or simply relax and breathe — low load, long duration.
- The goal is matching the right knee's end-range to the left. Compare sides weekly.
- Morning + evening + one daytime bout is the easiest pattern to keep.
Quad stretching — pick a favourite and go all-in
M3 · DAILY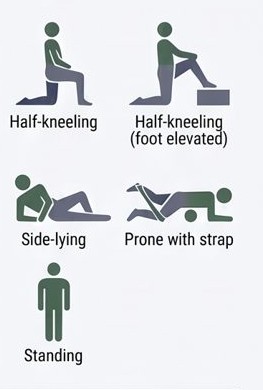
Five options (pictured) — choose the favourite and commit to it:
- Couch/wall stretch — kneeling, rear foot up on a chair or wall (most intense, best value if tolerated).
- Standing heel-to-butt with a chair for balance.
- Half-kneeling lunge with rear foot elevated.
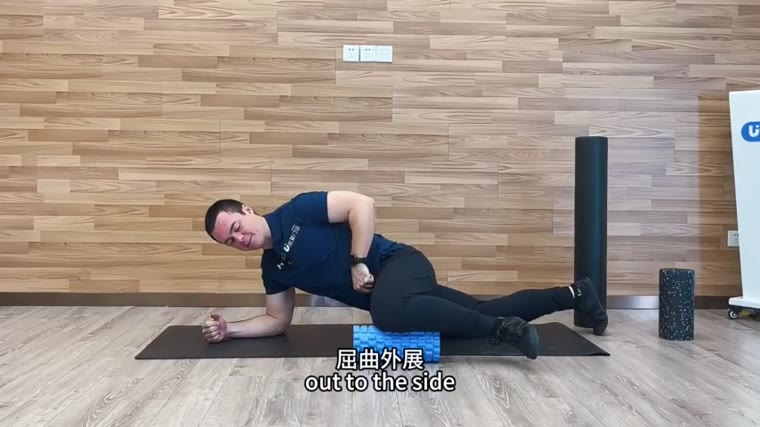
- Side-lying heel-to-butt pull.
- Prone with band/towel around the ankle.
Keep the pelvis tucked (don't arch the lower back). Feeling: front-of-thigh stretch 4–6/10, knee pain ≤3.
Left ankle dorsiflexion mobilization
M4 · 5 MIN DAILY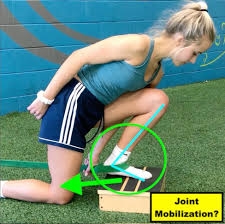
Half-kneeling, left foot flat in front. Drive the knee forward over the 2nd–3rd toe as far as it goes without the heel lifting, pause 2–3 s at end range, back off, repeat. Oscillate for a full 5 minutes. For a stronger stretch, rest the forefoot on the foam yoga block (heel stays on the floor).
- Track progress with the knee-to-wall test weekly: toes X cm from the wall, knee still touches it. Left should close the gap on right over the weeks.
- Feeling: a stretch or block at the front of the ankle or calf — not pinching pain.
- A stiff left ankle shifts load to the other leg, so this also protects the right knee.
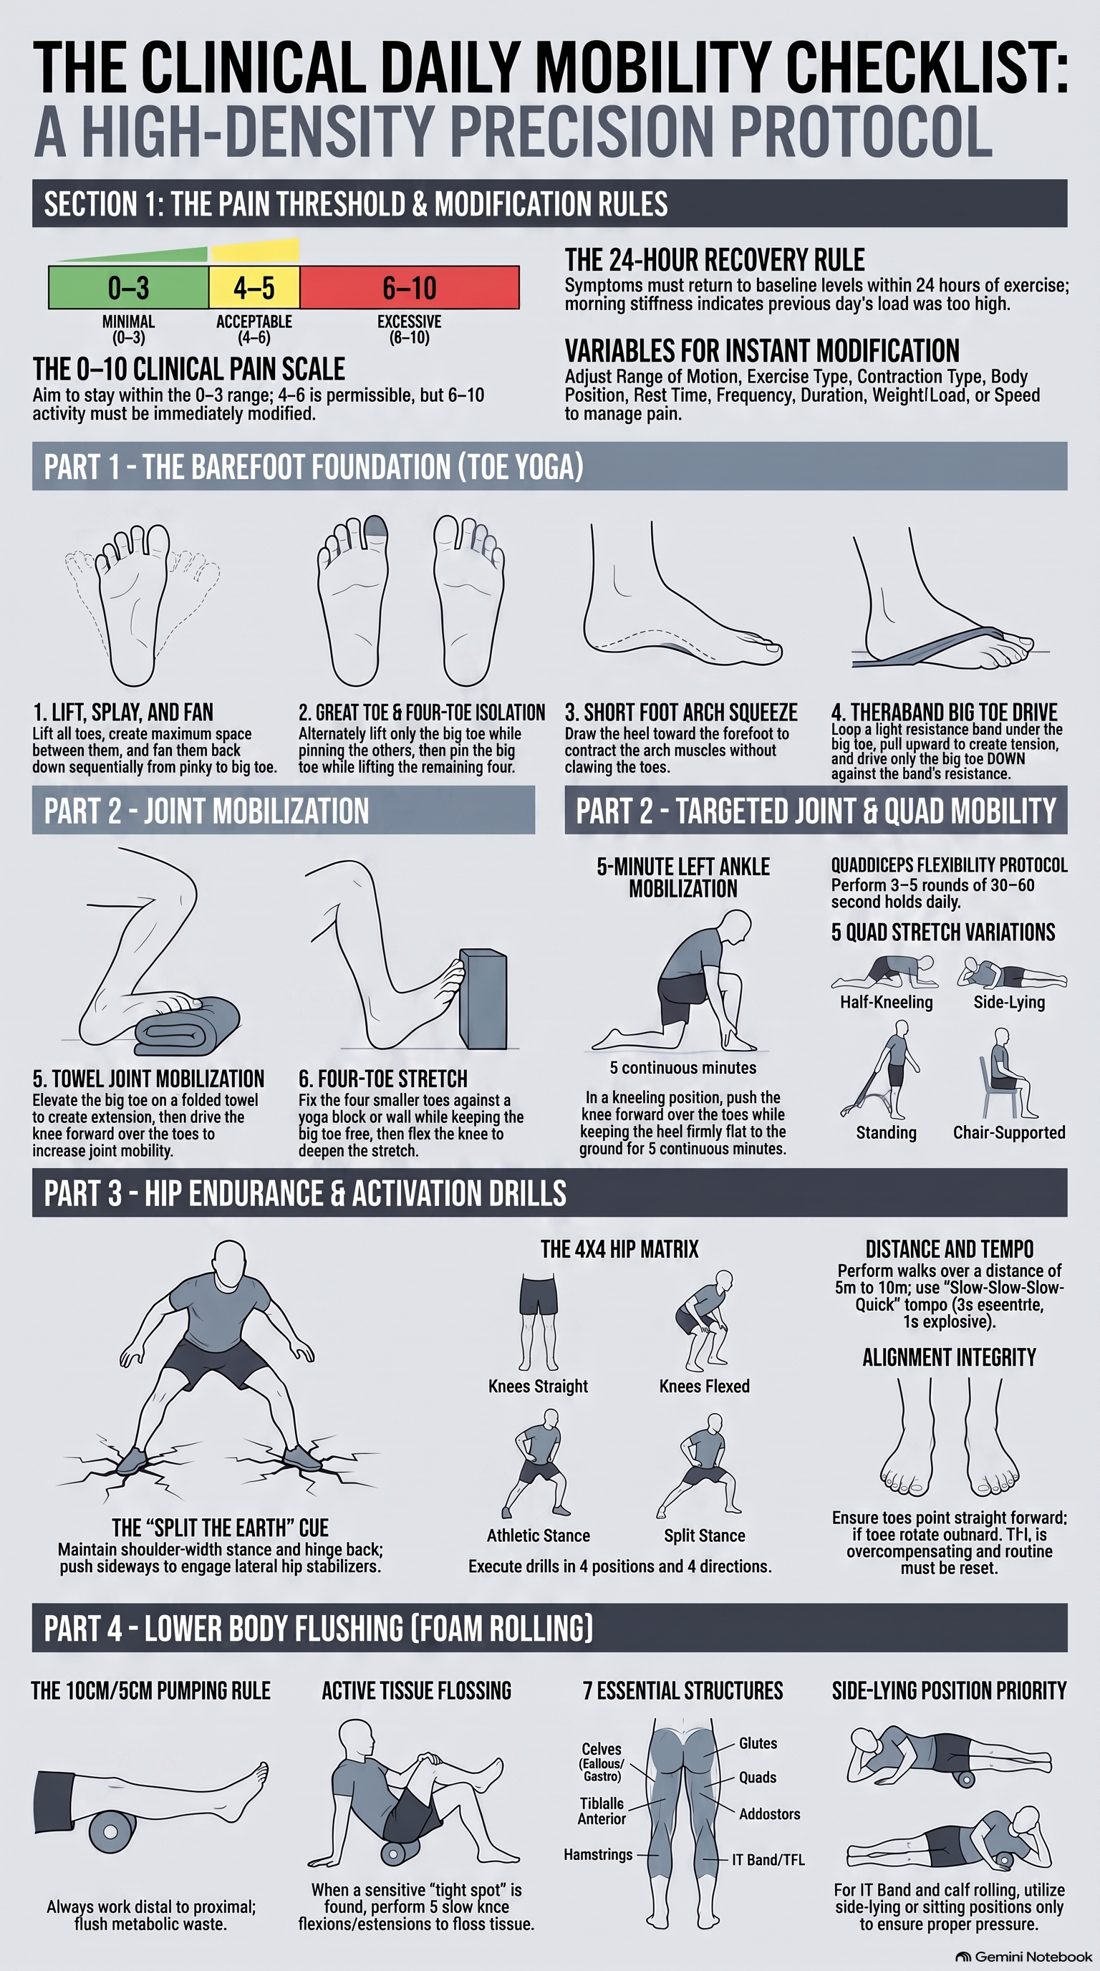
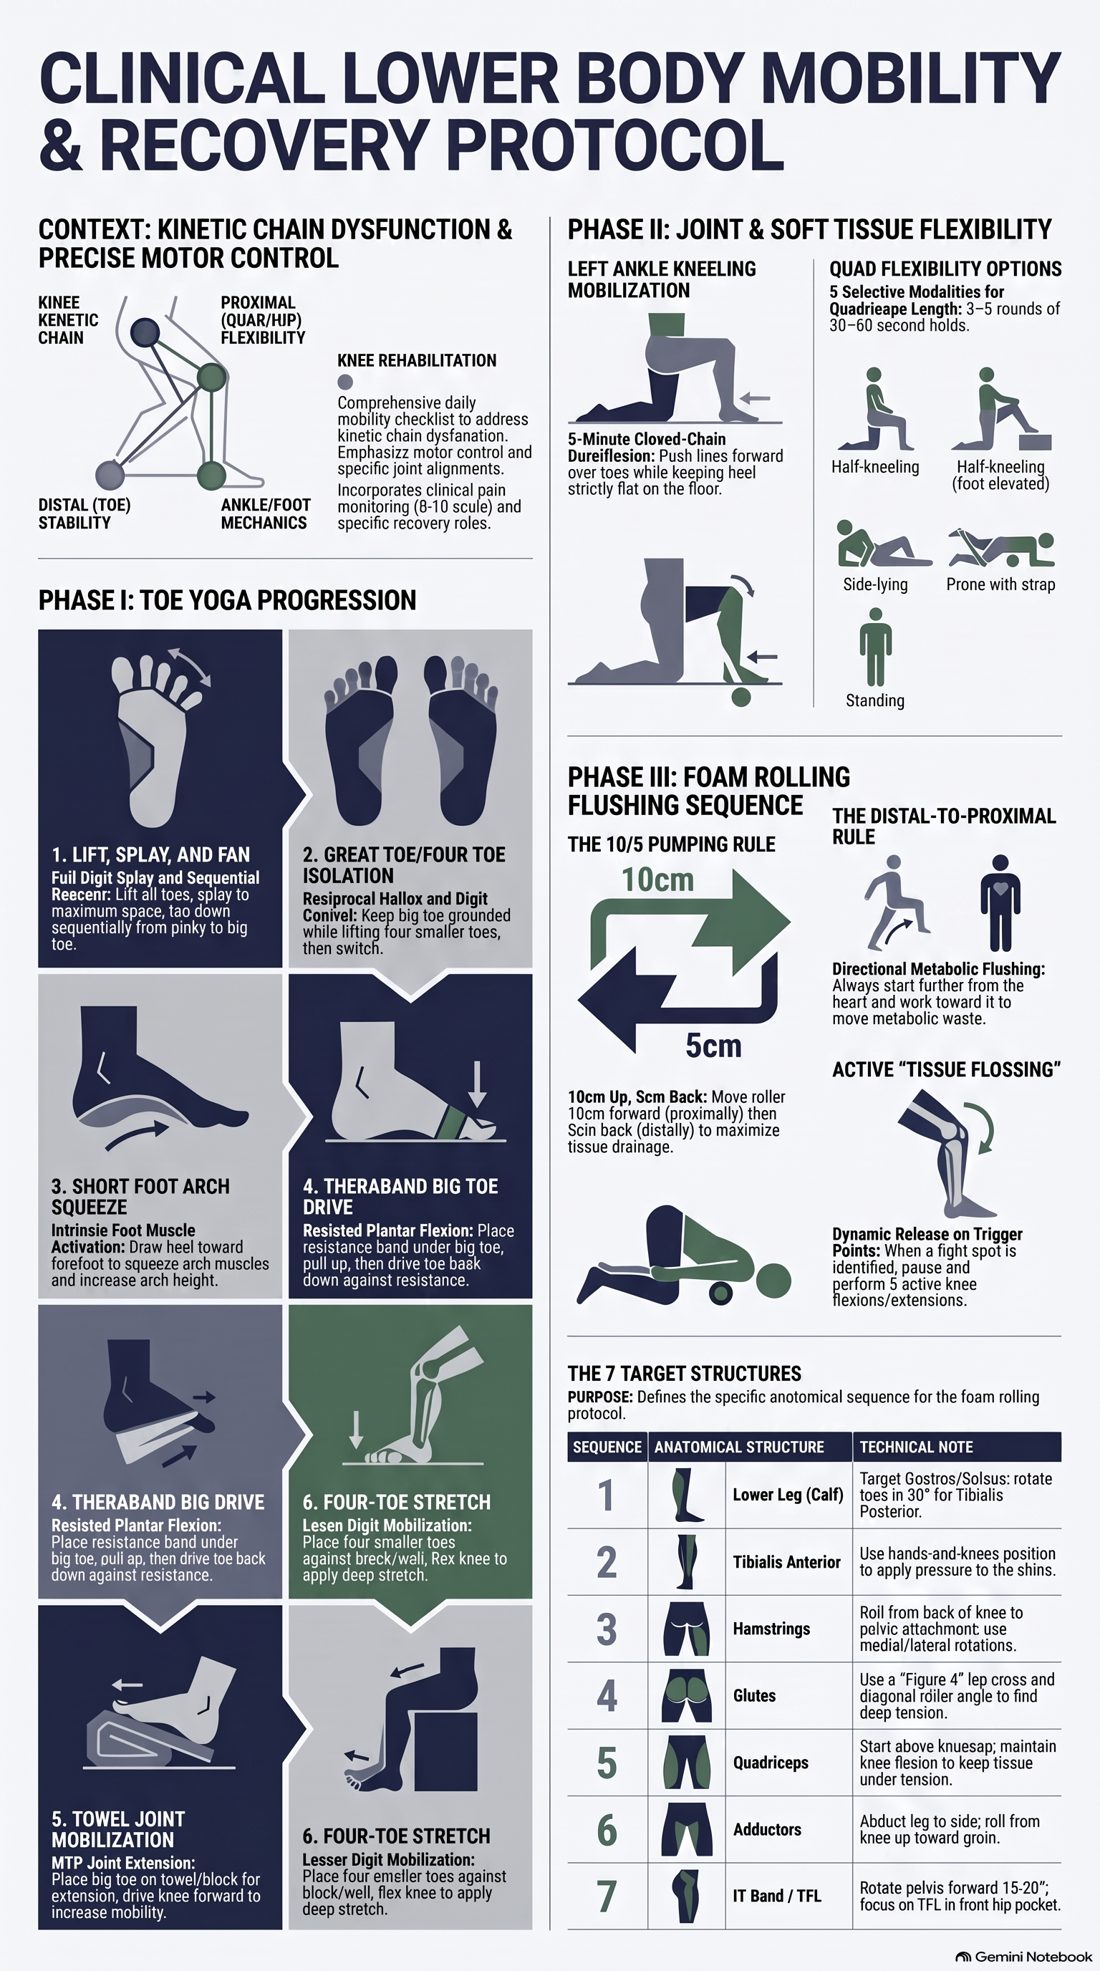
Optional attachment — printable quick-reference posters for the daily routine
Two one-page summaries of the daily mobility items (toe yoga, joint mobilization, quad stretches, hip drills, foam rolling). Handy to keep on the phone or print — the full doses and technique notes in this document take precedence where they differ.
The training week — gym Mon · Wed · Sat
Rehab add-ons run after the gym session, never as a fatigued warm-up before heavy lifts. If a gym day already hits leg press, lunges, or leg curls hard, halve that day's add-on volume rather than stacking. The two home sessions sit between gym days so nothing is trained hard two days in a row.
| Day | Sessions | Extra time |
|---|---|---|
| Mon | GYM trainer program + Push add-on (S1–S3) DAILY M1–M4 | ~40 min |
| Tue | HOME Rehab 1: hip circuit (H1–H5) + adductors (A1–A3) ROLL F1–F6 DAILY | ~55 min |
| Wed | GYM trainer program + Pull add-on (P1, P3) DAILY | ~40 min |
| Thu | EASY M1–M4 + massage gun optional · Phase 3+: impact micro-session (§8) | ~25 min |
| Fri | HOME Rehab 2: hip circuit (H1–H5) + home push & pull (S1, S2, P1 on the swiss ball) + A3 DAILY | ~55 min |
| Sat | GYM trainer program + Adductor add-on (A1–A3 on bench) ROLL optional DAILY | ~35 min |
| Sun | REST M1–M4 + weekly self-checks (§9) · Phase 3+: 2nd impact micro-session | ~30 min |
Day plans — pull this up on the day
Every day also includes the M1–M4 daily items from §3. Hover any photo to watch the exercise. Full technique notes live in §6 (strength) and §7 (rolling).
Gym + push add-on
~15 min after the trainer session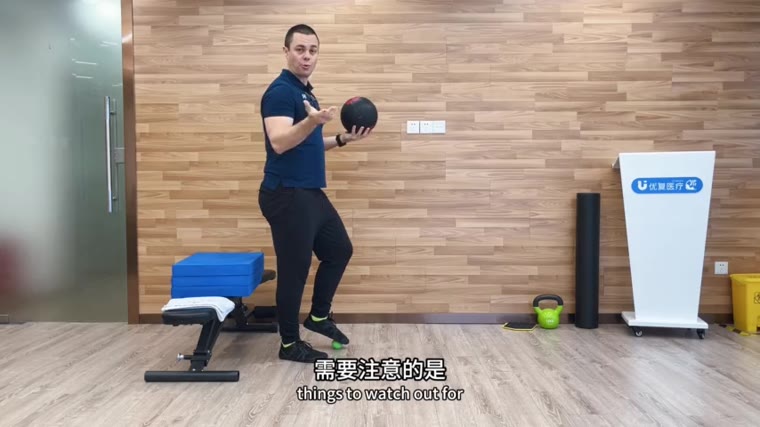
S1 · Counterbalance squat to a target
3 × 8–12 · 8 kg KB held outSquat to lightly touch a bench/pad, bell reaching forward on the way down. Lower the target over the weeks.
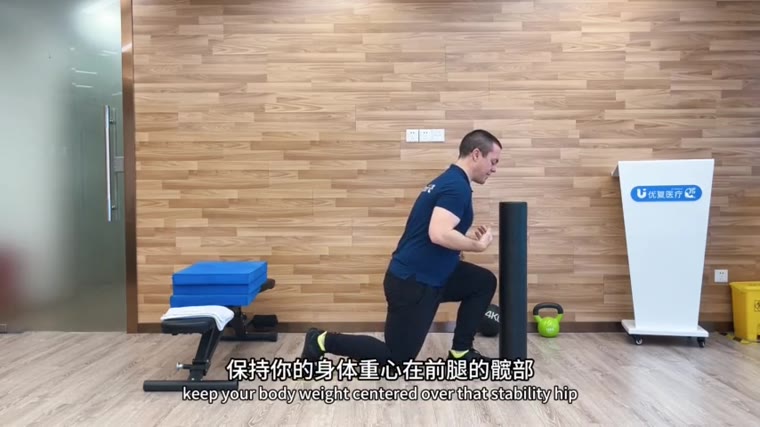
S2 · Split squat
3 × 6–10/side · bodyweight → goblet 8–16 kg90–95% of weight on the front leg; back knee to just above the floor. Extra set with the right leg in front.
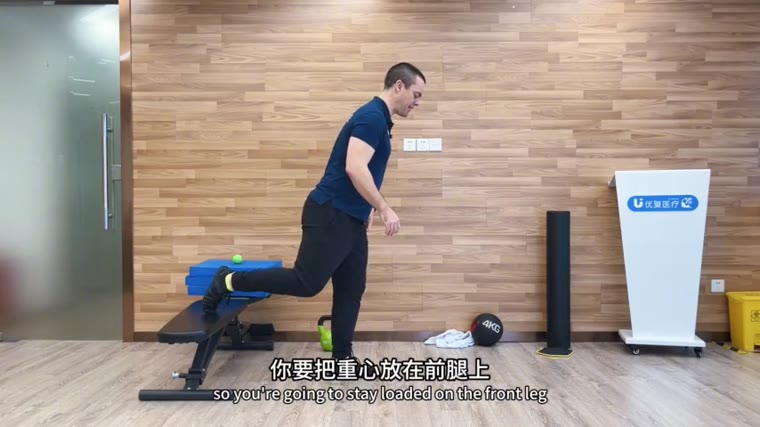
S3 · Bulgarian split squat (replaces S2 from Phase 2)
3 × 5–8/side · 8 → 16 kg gobletRear foot on a bench. Start only when S2 is clean and ≤3 pain at 12 kg.
Home Rehab 1 — hips + adductors + rolling
~45 min + 10 min rolling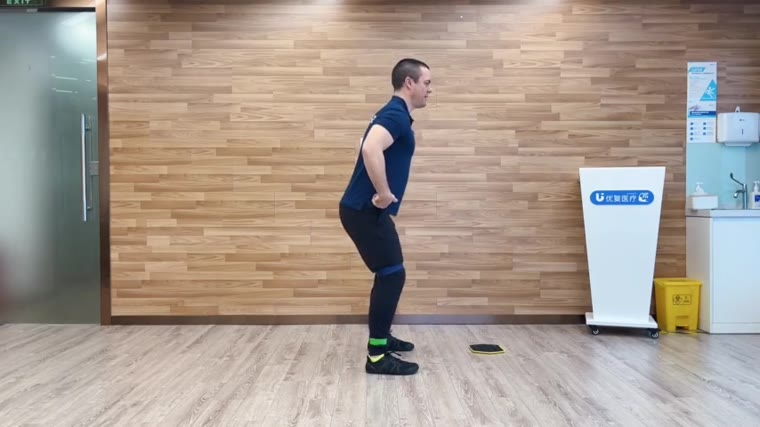
H1 · Banded squat with knee control
2 × 10 slow + 5 knee in/out per sideMini band above knees; sit back "as if onto a chair"; knees track over the feet.
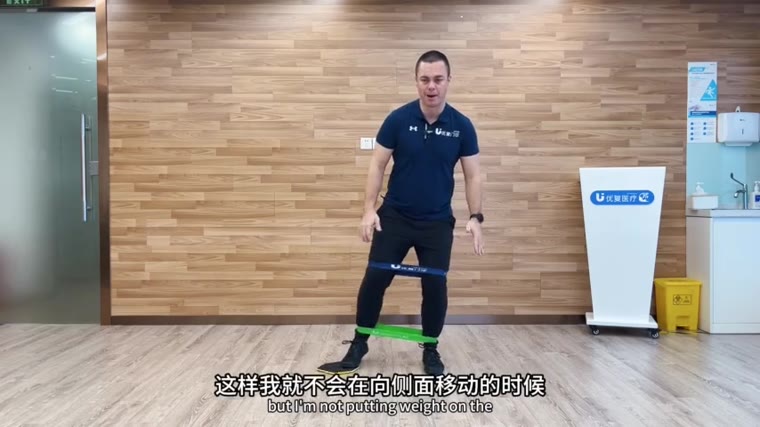
H2 · Standing "split the floor" abduction
3 × 20 s holdBand at ankles, pull the feet apart as if splitting the floor; stand tall.
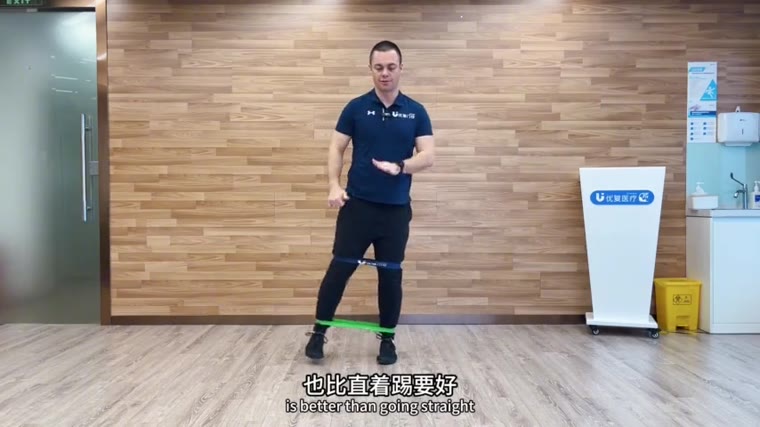
H3 · Single-leg stance + leg reaches
2 rounds/side · 5 reaches fwd/side/backAll the work is in the stance leg. Right-as-stance gets the extra round.
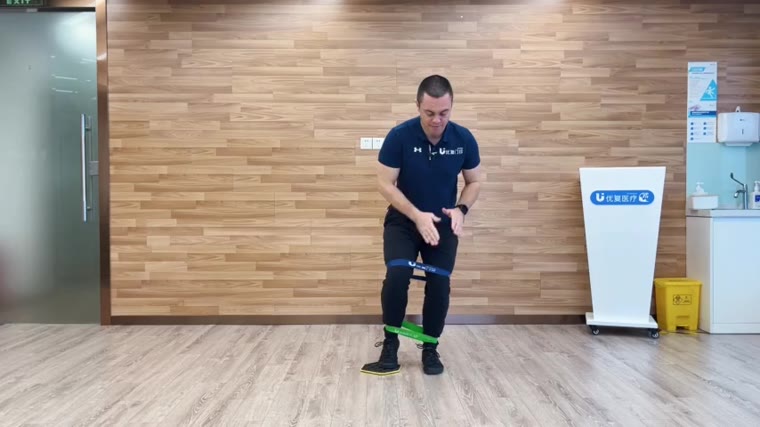
H4 · Monster steps
2 × 10 small steps each directionBand taut, very small steps forward / back / sideways; knees pushed out; the hip burn is the point.
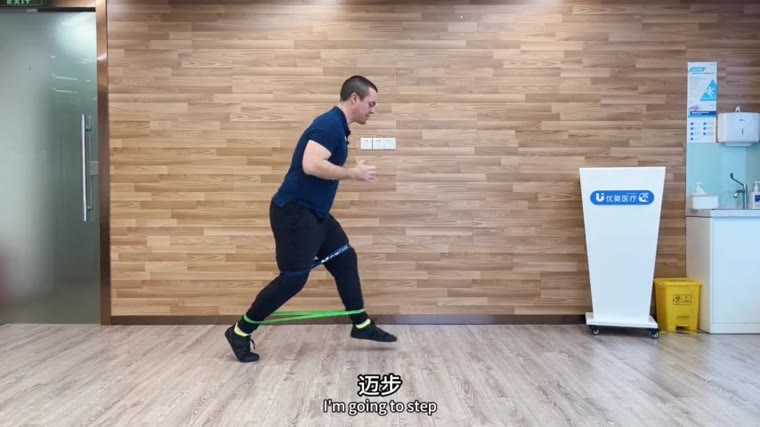
H5 · Band step-throughs
2 × 5/sideStep into a long split stance against the band; weight and focus on the front leg.
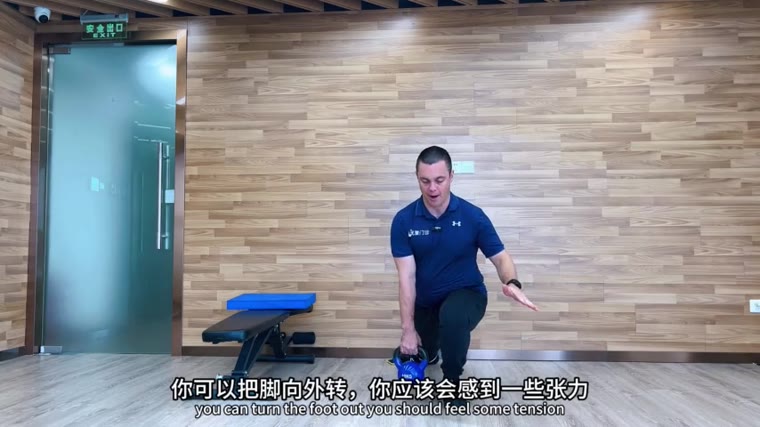
A1 · Reverse slide lunge with rotation
2–3 × 5–8/side · towel slider · 8–12 kg gobletBack foot slides on a towel, turned slightly out; 90–95% weight on the front leg.
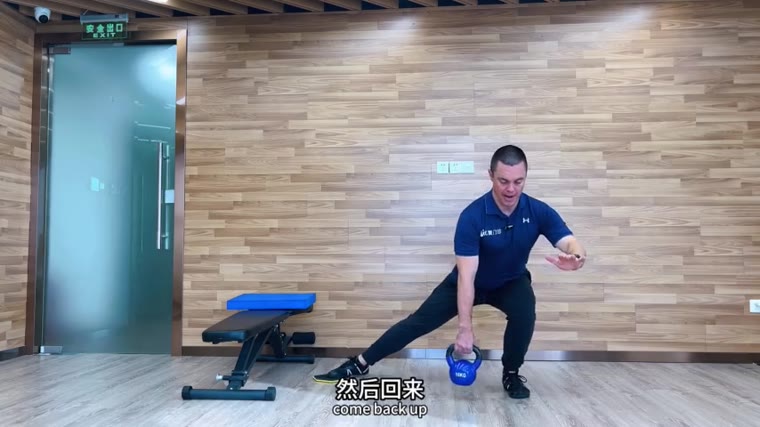
A2 · Lateral slide lunge
2–3 × 5–8/sideSlide sideways, hinge over the stable leg; depth is earned — no sharp inner-thigh pain.
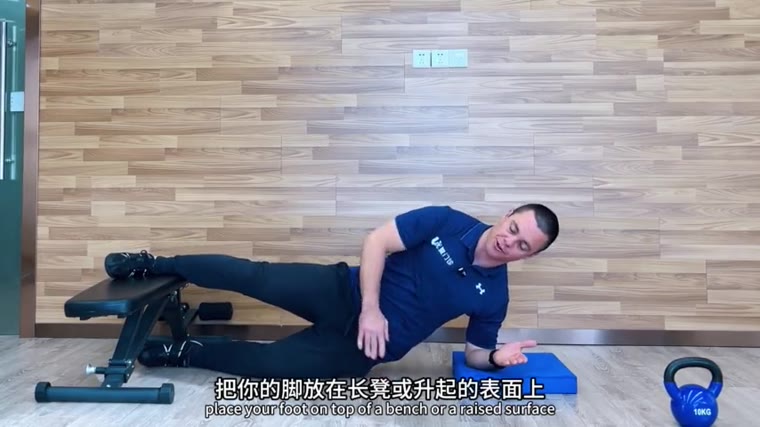
A3 · Copenhagen plank
3 × 10–20 s/side, build to 30 sTop leg on the sofa/chair; elbow under shoulder; hips pressed forward. Level up only when the current level is easy.
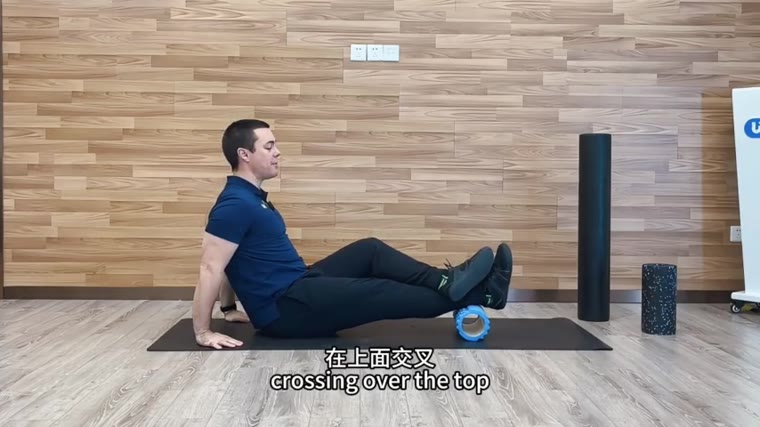
F1–F6 · Foam rolling routine
~15 s per structure · 5–10 min totalCalves → shins → hamstrings → glutes → quads → lateral thigh. Full sequence in §7.
Gym + pull add-on
~15 min after the trainer session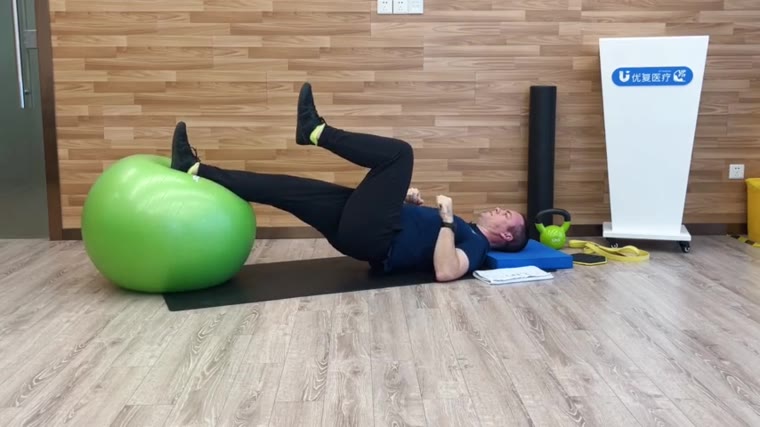
P1 · Swiss-ball hamstring ladder
2–3 × 8–12Bridge hold → curls → arms crossed → single-leg. Master one level before the next.
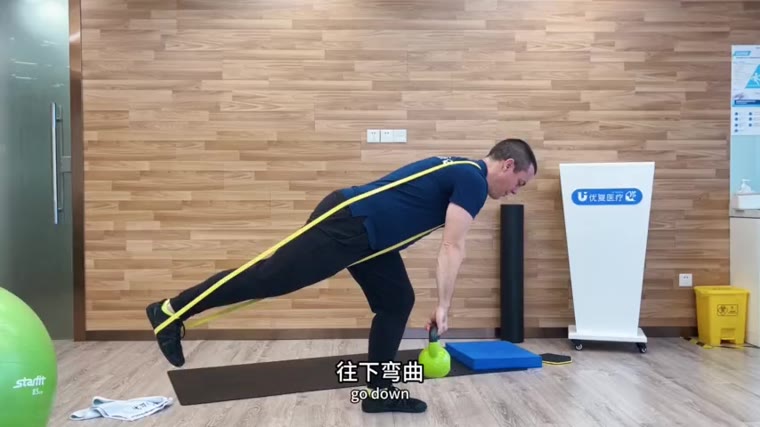
P3 · Single-leg RDL
2–3 × 6–8/side · 8–12 kg (band version in Phase 1)Soft stance knee; free leg reaches back toward the wall behind; hips square.
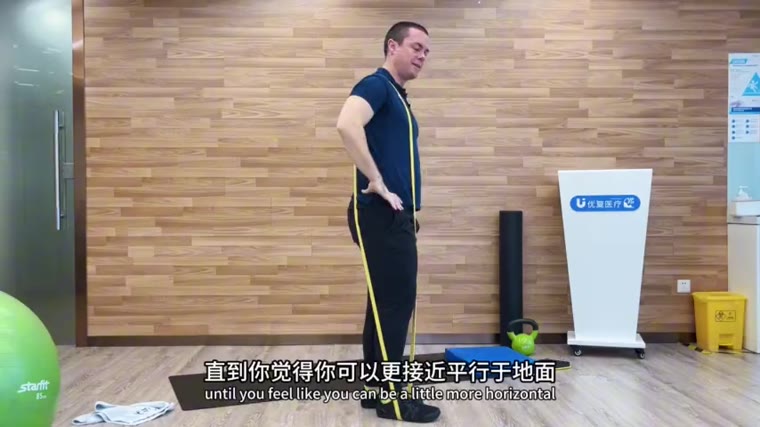
P2 · Kettlebell RDL (only if the gym session had no hinge/leg-curl work)
3 × 8–10 · 16–20 kgHips push straight back, soft knees, hamstrings load, stand tall.
Easy day
~25 min totalM1–M4 · Daily items only
Toe yoga · knee mobilization · quad stretch · ankle mobilizationPlus massage gun on quads/calves if anything feels worked from Tue/Wed.
Phase 3+ only · Impact micro-session
5–8 min, fresh legsCurrent rung of the impact ladder (§8): pogos → skipping → single-leg pogos. Never after leg training.
Home Rehab 2 — hips + home push & pull
~50 minH1–H5 · Hip endurance circuit
Full circuit, ≤10 minSame as Tuesday: banded squat → split the floor → single-leg reaches → monster steps → step-throughs.
S1 · Goblet squat to a target (home)
3 × 8–12 · 8–16 kgSquat to a chair or stacked yoga blocks with a kettlebell at the chest; control the touch. Remove a block as depth improves.
S2 · Split squat (home) — Phase 2+: S3 with rear foot on the sofa
3 × 6–10/side · goblet 8–16 kgSame rules as Monday; right leg in front gets the extra set.
P1 · Swiss-ball hamstring ladder
2–3 × 8–12Same ladder as Wednesday, on the home ball: bridge → curls → single-leg. Towel-slider curls are the backup if space is tight.
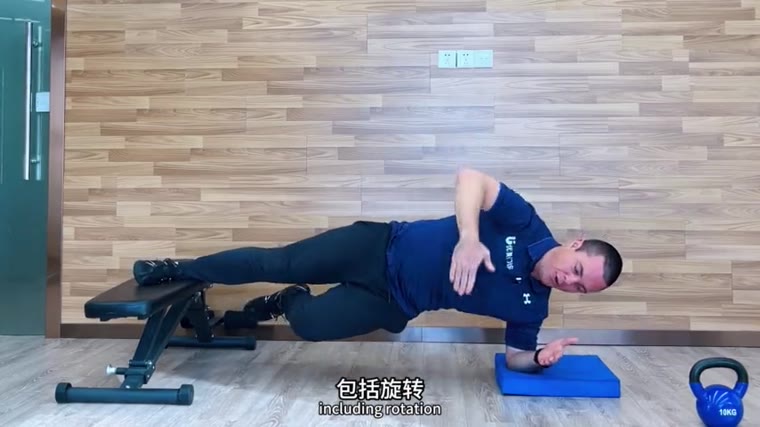
A3 · Copenhagen plank
3 holds/side at the current levelProgressing short lever → long lever across the phases.
Gym + adductor add-on
~10–12 min after the trainer sessionA1 · Reverse slide lunge with rotation
2 × 5–8/side · gobletUse a slider or towel on the gym floor; foot turned slightly out.
A2 · Lateral slide lunge
2 × 5–8/sideHinge back over the stable leg; add depth only as control allows.
A3 · Copenhagen plank on the bench
3 × 10–30 s/sideThe bench makes level changes easy: knee on bench → foot on bench → add lifts.
Rest + weekly self-checks
~30 min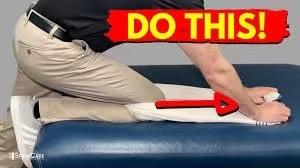
M1–M4 · Daily items
As every dayKeep the streak — Sunday counts toward the 6+ days/week compliance target.
Weekly self-checks
5 minutes · write the numbers downThe four checks from §9: knee-to-wall both ankles, right-knee extension vs left, single-leg sit-to-stands, compliance count.
Phase 3+ only · 2nd impact micro-session
5–8 min, fresh legsOnly if Thursday's session passed both 24-hour checks.
Phases & progression gates
Move to the next phase only after passing the gate — by date at the earliest, by criteria always. If a gate fails, stay put a week and retest; that's the plan working, not failing.
Phase 1 · Aug 24 – Sep 13 (weeks 1–3) — Control & activation
- Learn every exercise at the listed starting doses; keep loads light (8–12 kg goblet max).
- Establish the M1–M4 daily habits — target 6+ days/week compliance, tracked in the log.
- Gate to Phase 2: all rehab exercises ≤3 pain during and ≤ baseline next morning · right knee reaches full extension equal to left (M2) · knee-to-wall gap narrowing on the left ankle · Copenhagen (A3) short-lever 15 s/side without groin pain.
Phase 2 · Sep 14 – Oct 11 (weeks 4–7) — Single-leg strength
- Progress S2 → S3 (Bulgarian); A3 short → long lever; P3 band → kettlebell; P1 to single-leg on the ball. Add load before adding exercises: 8 → 12 → 16 kg.
- Add the calf-raise ladder (R0 in §8) to prepare tissue for impact.
- Gate to Phase 3: S3 3×8/side with 12 kg, right leg pain ≤3 · single-leg calf raises ≥20 both sides · A3 long-lever 20 s/side · P3 12 kg ×8/side with steady balance · single-leg sit-to-stand to a chair ×5/side.
Phase 3 · Oct 12 – Nov 1 (weeks 8–10) — Load + first impact
- Keep strength moving up (16–20 kg where clean) and start the impact ladder (§8): R1 double-leg pogos → R2 skipping → R3 low single-leg pogos. Impact runs 5–8 min, 2×/week (Thu + Sun), always on fresh legs.
- Flag to the physio that impact work is starting — impact progression is meant to be reviewed together.
- Gate to Phase 4: 3 impact sessions in a row with pain ≤3 and no next-morning stiffness · single-leg pogos 2×20 both sides feeling symmetric.
Phase 4 · Nov 2 – 15 (weeks 11–12) — Hop-test prep
- Impact ladder continues to R4 (low box landings, small forward hops); strength maintains at Phase-3 loads.
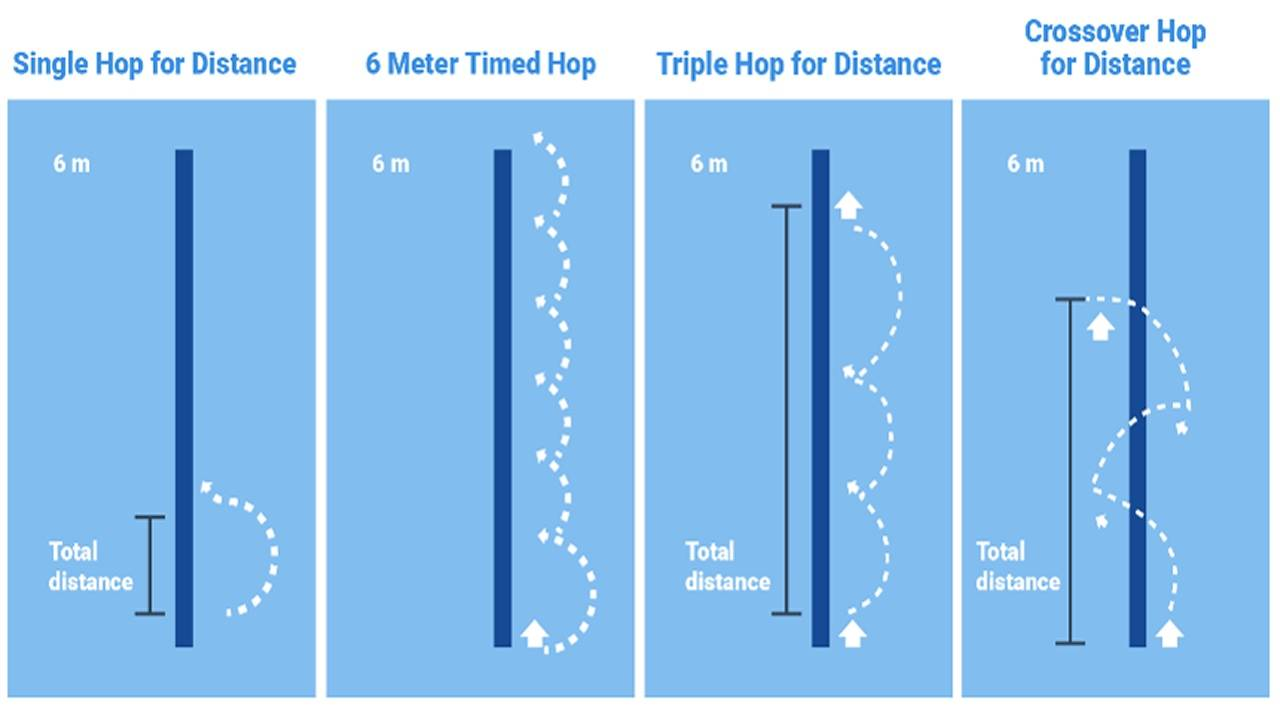
- Rehearse the four hop tests (§8) sub-maximally. Formal testing at ≥90% symmetry (research standard: 95%) is best done together with the physio.
- Two weeks is enough to consolidate — anything not passed by Nov 15 simply continues; the calendar ends, the criteria don't.
Exercise library — full technique notes
Hover (or tap) any photo to loop the exact part of the source video showing that exercise.
6-A · Hip endurance band circuit H1–H5 (home · ≤10 min, runs inside Rehab 1 & 2)
Slow-tempo endurance for the lateral hip stabilizers — the muscles that stop the knee collapsing inward. Do the circuit top to bottom with minimal rest; the whole set should take no more than 10 minutes.
Banded squat with knee control
H1Feet a little wider than shoulders, sit back and down "as if onto a chair" — not too far forward, not too far back. Knees stay in line with the feet against the band's pull the whole way.
- At the bottom: slowly let one knee drift in with control, then drive it back out fast against the band. 5 in-slow/out-quick reps per side.
Standing "split the floor" abduction
H2Band around the ankles, feet just outside shoulders, knees straight first. Pull the feet apart as if splitting the floor sideways and hold. Stand tall — crown of the head pressed to the ceiling.
- Progress with a wider stance or a stronger band; then repeat with a soft knee bend.
Single-leg stance + leg reaches
H3All the work happens in the stance leg. Stand on one leg, weight fully loaded onto it, and reach the free leg against the band: forward, to the side, straight back — slow out, controlled return.
- Stance knee in line with the foot; pelvis level; head tall.
- Right leg as stance leg gets the extra round — this is the imbalance work.
- For the back-reach: as if tapping the heel to a wall behind you.
Monster steps — small steps in all directions
H4Slight hip hinge, band taut, then very small steps — sideways both ways, forward, backward — keeping constant tension and the knees pushed out. The burn on the outside of the hips is the point: endurance, not damage.
Band step-throughs / split-stance taps
H5From standing, step into a long split stance against the band, keeping all focus and weight on the front (stable) leg, then drive back to standing. Finisher of the circuit.
6-B · Adductors A1–A3 (Rehab 1 + Saturday gym add-on)
Smaller muscle groups that aren't used to direct load — no sharp pain allowed at any point, and expect them to fatigue fast. Compare sides; if one is dramatically weaker, that's the imbalance showing — give it one extra set, not sets to failure.
Reverse slide lunge with rotation
A1Front foot planted, back foot on a towel (smooth floor) sliding straight back into a lunge, then drag it back in while standing up — 90–95% of the weight stays on the front leg the whole time.
- Adductor bias: turn the sliding foot slightly outward — gentle tension along the inner thigh.
- The kettlebell at the chest is a counterbalance: it makes the movement easier to control, not harder.
Lateral slide lunge (Cossack)
A2Slide or step one leg sideways, hinge back and down over the stable leg — the straight leg's inner thigh lengthens under load — then pull back up through the stable leg.
- Depth is earned: start shallow, add range as pain and control allow (pain ≤3, never sharp).
Copenhagen plank — short → long lever
A3Side plank with the top leg on a bench: elbow directly under the shoulder, hips pressed forward ("push the belt buckle forward"), body in one line.
- Level 1 (Phase 1): top-leg knee on the bench, bottom leg assisting on the floor.
- Level 2 (Phase 2): knee on bench, bottom leg lifted.
- Level 3 (Phase 2–3): foot/ankle on the bench — long lever. Optionally add small hip lifts, lever forward and back.
- Master one level before touching the next; note how left and right compare.
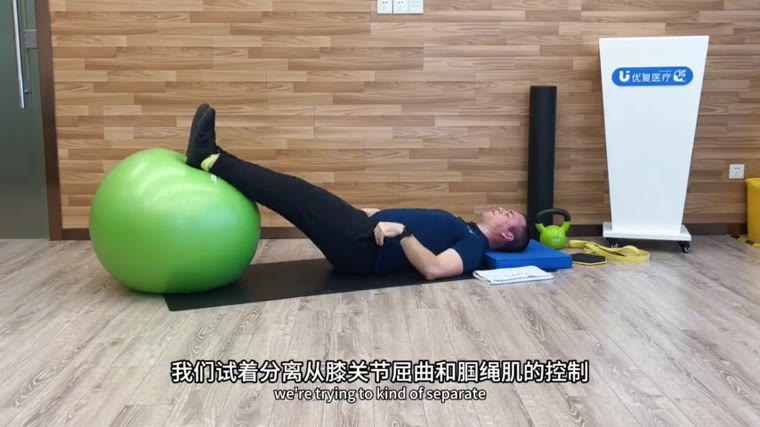
6-C · Lower-body pull P1–P3 (Wednesday gym add-on + Friday home session)
Swiss-ball hamstring ladder
P1The classic hamstring rehab ladder. Lying on the back, heels on the ball:
- Step 1: bridge — lift the hips and hold, body in a line.
- Step 2: hips stay extended while the heels pull the ball in and out (the curl).
- Step 3: arms across the chest for a core challenge.
- Step 4 (Phase 2+): single leg — one heel on the ball, other leg in the air.
No ball within reach? Towel-slider curls work too — heels on a towel on smooth floor, bridge up, slide out, drag back in. Shorten the range rather than dropping the hips.
Kettlebell RDL (two legs)
P2Feet hip width, soft bend in the knees, push the hips straight back until the hamstrings load, torso stable, then stand by driving the hips forward. The knee angle barely changes — a hinge, not a squat.
- Skip it on days the gym program already includes RDLs or leg curls — don't stack.
Single-leg RDL
P3 · PHASE 2+Stand on one leg (soft knee), hinge forward while the free leg reaches straight back "toward a wall behind you," hips staying square, until the torso is near parallel — then drive back up through the stance leg.
- The stance leg's lateral hip stabilizers do half the work — wobble is normal at first; find stability before adding depth or load.
- The band version (band under the stance foot, held in the hands) is the learning tool before the kettlebell.
- Tight hamstrings limiting range is normal — work within the available range.
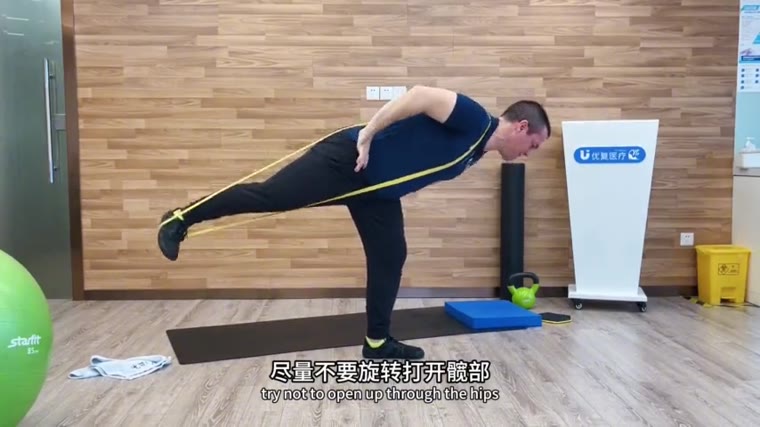
6-D · Lower-body push S1–S3 (Monday gym add-on + home versions in Rehab 2)
The ladder that rebuilds stairs → running → jumping capacity. The counterbalance (a light kettlebell held out at the chest) makes squatting easier and cleaner, not heavier.
Counterbalance squat to a target
S1Squat down to lightly touch a bench or stacked pads, bell reaching forward on the descent, torso stable, then stand. Control the touch — no plopping down.
- Progress: lower the target height → slow the descent (3 s down) → hold a heavier bell close to the chest.
- The right knee should track over the foot and share load evenly with the left. Film one set from the front once a week.
Split squat
S2Long split stance, front shin roughly vertical, only 5–10% of the weight on the back leg. Lower the back knee to just above the floor, drive up through the whole front foot.
- Stance too long = balance exercise; too short = knee-dominant and cranky. Adjust until the front leg works and pain stays ≤3.
- All focus on the front leg — that's where the work belongs.
- Right-leg-front gets one extra set until it matches the left for reps at the same load.
Bulgarian split squat
S3 · PHASE 2+Same rules as the split squat but with the back foot resting on a bench — nearly all load on the front leg. Main single-leg strength builder from Phase 2, and the Phase-3 gate exercise.
- Start only when S2 is clean and ≤3 pain at 12 kg.
- Sets go to comfortable fatigue — last 2 reps hard, never grinding.
Foam rolling F1–F6 (2–3×/week: Tuesday, Friday or Saturday evening)
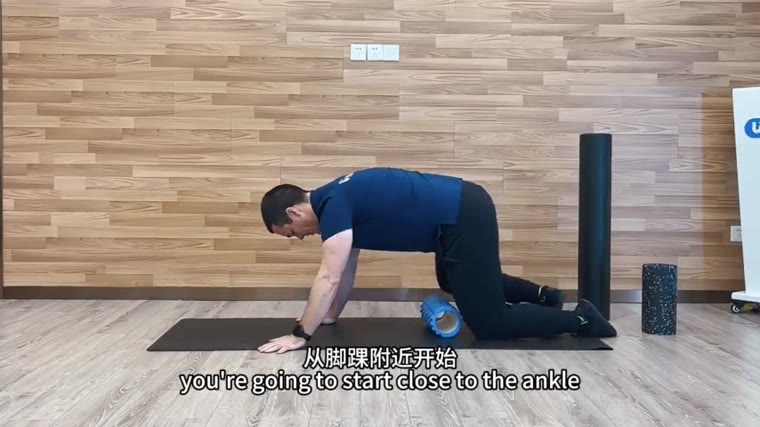
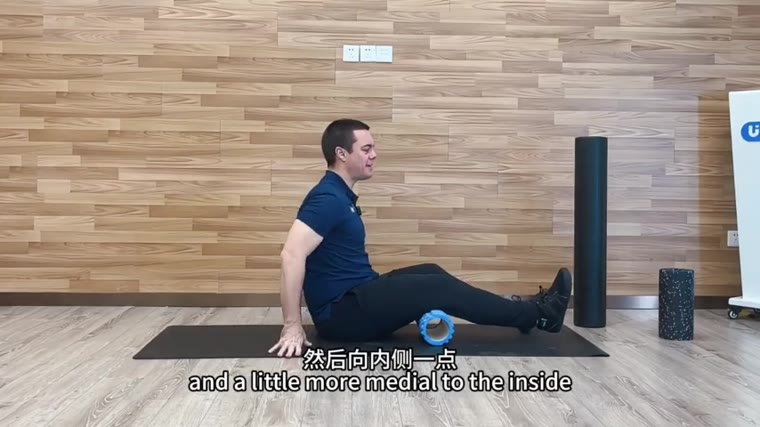
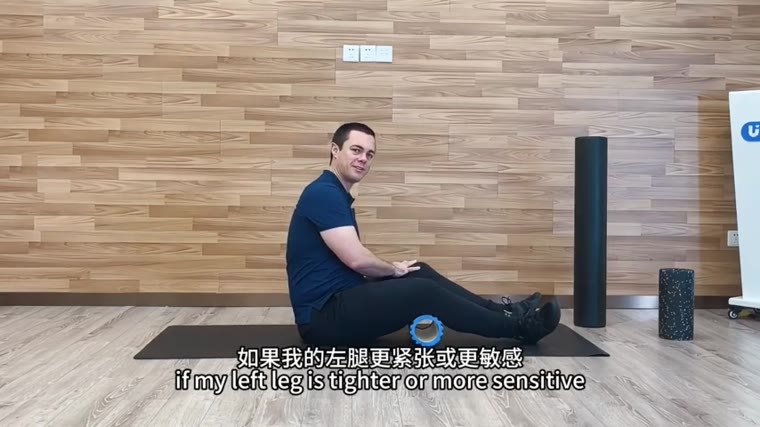
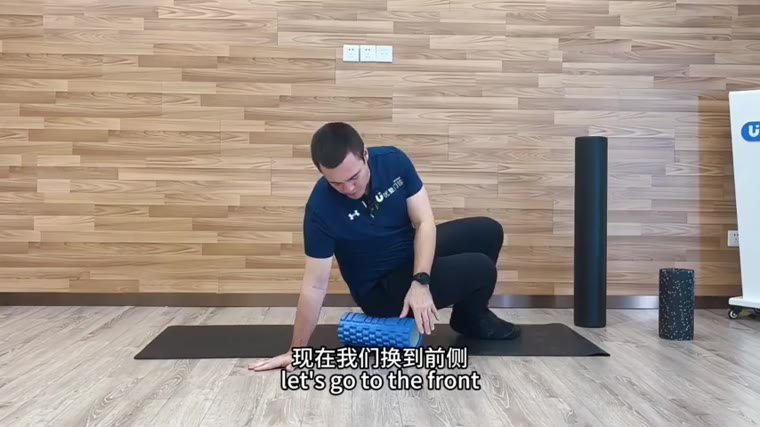
This is a general "flush," not trigger-point torture. Roll each structure ~15 seconds, working from far to near — always toward the heart: about 10 cm up, 5 cm back. On a sensitive spot, pause and breathe until it eases; on the quads and lateral thigh you can add 5 slow knee bends while paused ("tissue flossing"). Total: 5–10 minutes. The massage gun substitutes on lazy days; the massage ball beats the roller for the foot arch and glute corners.
Impact ladder R0–R5 & the hop tests
Hop testing isn't tolerable yet — the goal is to build tolerance rung by rung, then formally test at ≥90% left–right symmetry (research standard: 95%). Each rung: 2×/week (Thu + Sun), on fresh legs, pain ≤3 during, settled within 24 h, no morning stiffness — two clean sessions before climbing.
| Rung | Earliest | What |
|---|---|---|
| R0 | Phase 2 | Calf-raise ladder: double-leg raises 3×15 → single-leg 3×8→20/side (use a step for full range). Tissue prep — don't skip it. |
| R1 | Phase 3 | Double-leg pogos: small, springy, quiet hops in place, knees nearly straight, 3 × 20 s. |
| R2 | Phase 3 | Skipping / rope: 3–5 × 30 s easy pace. |
| R3 | Phase 3 | Single-leg pogos: low, 2–3 × 10–20/side. This is where left/right feel gets compared honestly. |
| R4 | Phase 4 | Low box step-off landings (10–20 cm), stick the landing 3 s; then small forward hops, stuck landings. |
| R5 | Phase 4 | The four hop tests (below): sub-max rehearsal first; formal testing is best done with the physio. |
Hard rule
No maximal hop testing before the ladder is complete and reviewed. Testing early is how a 12-week plan becomes a 24-week one.
Tracking, weekly self-checks & red flags
Keep a dumb-simple log (notes app is fine). Per session, one line:
- Date and what was done (codes are enough: "Tue R1: H1–H5, A1–A3, F roll")
- Heaviest load used
- Worst pain during (1–9)
- Next-morning stiffness (yes/no)
Every Sunday, 5 minutes — the same four checks
- Knee-to-wall test, both ankles — distance in cm.
- Right-knee full extension vs left, in the M2 position — equal or still short?
- Single-leg sit-to-stand to a chair — max clean reps per side.
- Compliance — how many of the last 7 days included the M1–M4 daily items?
Write the four numbers down. Rising numbers mean the plan is working, even on weeks that felt flat.
Stop and get the knee looked at if any of these appear
- Pain ≥6 during any exercise
- Visible swelling the next day
- The knee locking, catching, or giving way
- Pain that hasn't returned to baseline after 48 hours
- Night pain
Sources: the instruction notes, reference images, and six exercise videos in this folder — all exercise stills and hover-videos come directly from them. Guidance document, not medical advice; adjust with a professional as things progress.